The Ultimate Guide to the Perfect Arm Roast Recipe
So here’s the thing about arm roast—it’s one of those cuts that gets overlooked at the grocery store, and honestly? That’s a shame. When properly prepared (as I will demonstrate), arm roast transforms into incredibly tender, fall-apart beef, giving the impression that you’ve spent far more than you actually did.
I’ll be straight with you. The first time I tried making an arm roast, I had no idea what I was doing. I simply placed it in the oven and prayed for success. Three hours later, we were basically chewing on leather. This was definitely not my best moment. But after some trial and error (okay, a lot of error), I figured out the secret. And now? This dish is our Sunday dinner staple.
In this guide, I’m walking you through everything—and I mean everything—you need to know about cooking arm roast. We’ll discuss what it is, why it’s worth your time, how to choose a good one, and how to cook it so it’s fork-tender. If you’re looking for more beef inspiration, you might also like this beef stir-fry recipe that uses similar flavor-building techniques.
Whole cuts of beef like arm roast should reach a minimum internal temperature of 145°F with a 3-minute rest, per the USDA FSIS safe-temperature chart; braised cuts are typically taken much higher for fall-apart tenderness.
Cooked beef chuck arm roast averages about 28 g of protein and 3.5 mg of iron per 100 g per USDA FoodData Central.
What Is Arm Roast?
Okay, quick anatomy lesson (don’t worry, I’ll keep it short). An arm roast comes from the shoulder area of the cow, which is basically the part that does a lot of work. That means it’s got tons of connective tissue running through it. Sounds poor, right? Actually, it’s the best part.
All that connective tissue breaks down during slow cooking and turns into this rich, gelatinous goodness that makes the meat incredibly flavorful and moist. It’s why arm roast is perfect for braising, slow roasting, or anything where you’re cooking low and slow. If you rush the process, you will end up with a result similar to my first attempt, which was dry, tough, and not great. Take your time, and you get magic.
Why I Choose Arm Roast Over Fancier Cuts
Look, I love a juicy ribeye as much as the next person. But ribeye for Sunday dinner when I’m feeding five people? That’s not happening unless we win the lottery. Arm roast, on the other hand, costs a fraction of the price and—when cooked properly—delivers incredible flavor.
Plus, it’s just more practical. You can throw vegetables right in with it. The leftovers make wonderful sandwiches (more on that later). And because it’s a bigger cut, you can feed a crowd without going broke. It is the type of meal that leads others to perceive you as a significantly more skilled cook than you genuinely are. Not that I’m complaining about that.
Another bonus? It’s packed with protein and iron, which means it’s actually pretty nutritious. My kids need the iron (growing like weeds), and Nicolas appreciates any meal where he doesn’t get hungry again an hour later.
Picking the Right Roast at the Store
Previously, I would simply purchase the arm roast that was currently on sale and proceed with my day. And you know what? Occasionally that worked out fine. But if you know what to look for, you can consistently get better results.
What to Look For
First, check the marbling. You want to see little streaks of fat white running through the red meat. That fat is going to melt during cooking and keep everything juicy. If the meat looks super lean with barely any marbling, it might end up dry no matter what you do.
Color matters too. Look for bright, cherry-red meat. If it’s turning brown or looks dull, that’s a sign it’s been sitting around too long. Pass on that one.
And here’s something I didn’t know for years: the meat should feel firm when you press on the package. If it’s squishy or there’s a ton of liquid pooling in the bottom, that’s not ideal. A little liquid is fine, but excessive moisture can mess with your cooking times.
If you’re curious about other cuts and what they’re good for, I wrote a whole guide on what an arm roast is good for that goes into way more detail.
Meat Grades (Decoded)
You’ll sometimes see labels like “Prime,” “Choice,” or “Select” on beef. Prime is the top tier—tons of marbling, super tender, and also super expensive. Choice is the middle ground and honestly, that’s what I usually buy. It’s got excellent marbling and won’t break the bank. Select is the leanest and cheapest, but you’ll need to work harder to keep it moist.
For arm roast specifically, I think Choice is the sweet spot. You can obtain enough fat to keep the meat juicy without having to pay Prime prices. But if Select is what’s on sale and that’s what fits your budget? Go for it. Just make sure you marinate it well and don’t skimp on the cooking time.
Ingredients That Actually Matter
The meat is obviously the star, but the supporting cast is what makes this dish sing. You don’t need anything fancy—mostly pantry staples and whatever vegetables you’ve got lying around.
Herbs and Spices I Always Use
Garlic is non-negotiable. I use a lot of it—like, an embarrassing amount. Fresh is best, but if you only have garlic powder, that works too (I won’t judge). Rosemary and thyme are my go-to herbs because they smell amazing and pair beautifully with beef. If I’m feeling fancy, I’ll add a bay leaf or two.
Salt and black pepper seem obvious, but don’t skimp on them. You need more than you think, especially for a big hunk of meat like this. Season generously, or the inside will taste bland even if the outside is perfect.
My Marinade Strategy
I usually marinate the roast overnight if I remember (let’s be honest, sometimes I forget and do it for like two hours before cooking—it still works). My marinade is pretty simple: olive oil, soy sauce for that umami punch, some vinegar or lemon juice to help tenderize, and whatever herbs I’m using.
The acid in the vinegar or lemon juice breaks down those tough muscle fibers, which is especially helpful with a working muscle like the shoulder. Just don’t go overboard, or you’ll end up with mushy meat. A couple tablespoons is plenty for a 4- to 5- pound roast.
Prepping the Roast (Don’t Skip This)
Okay, so you’ve got your roast home. Before it goes anywhere near the oven, there’s some prep work to do. I know, I know—you just want to cook the thing. But trust me, these steps make a real difference.
Trimming the Fat
You’ll probably notice a thick layer of fat on one side of the roast, and maybe some weird silvery membrane (that’s called silver skin). You want to trim most of the fat—leave a thin layer for flavor, but get rid of the super thick parts, or your roast will be greasy. The silver skin needs to go completely because it won’t break down during cooking and just stays tough and chewy.
Use a sharp knife and go slowly. I’ve definitely nicked myself doing this (more than once, actually), so be careful. If you’re not confident with a knife, ask your butcher to do it when you buy the roast. Most are happy to help.
Marinating Tips That Work
Once the roast is trimmed, pat it dry with paper towels. This might seem counterintuitive before adding marinade, but a dry surface helps the marinade stick better. Put the roast in a big zip-top bag, pour in your marinade, seal it up, and massage everything around so the meat is evenly coated.
Stick it in the fridge and turn it over a few times if you remember. The longer you marinate, the more flavor penetrates, but even a few hours makes a difference. If I’m really crunched for time, I’ll at least rub it with salt, pepper, and garlic and let it sit while the oven preheats. Not ideal, but life happens.

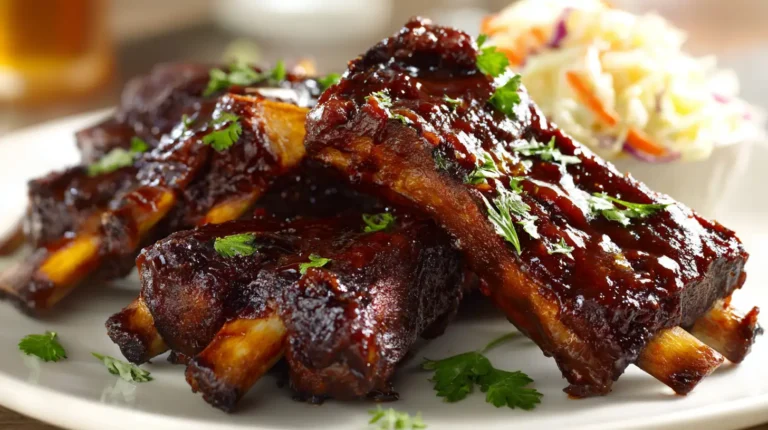
Arm Roast Recipe: Cooking Methods That Actually Work
There are a few different ways to cook an arm roast, and honestly? They all work. It just depends on what equipment you have and how much time you’ve got. I’ll walk you through my favorite methods.
Oven Roasting (The Classic)
This is my default method because it’s hands-off and works every time. Start by preheating your oven to 325°F. Not 350, not 300—325 is the sweet spot for breaking down connective tissue without drying out the meat.
Before the roast goes in the oven, sear it. This step is important. Heat up a big skillet or Dutch oven until it’s smoking hot, add a little oil, and sear the roast on all sides until it’s deeply browned. This takes maybe 10 minutes total and creates so much flavor. Don’t skip it just because you’re in a hurry (I’ve tried—it’s not the same).
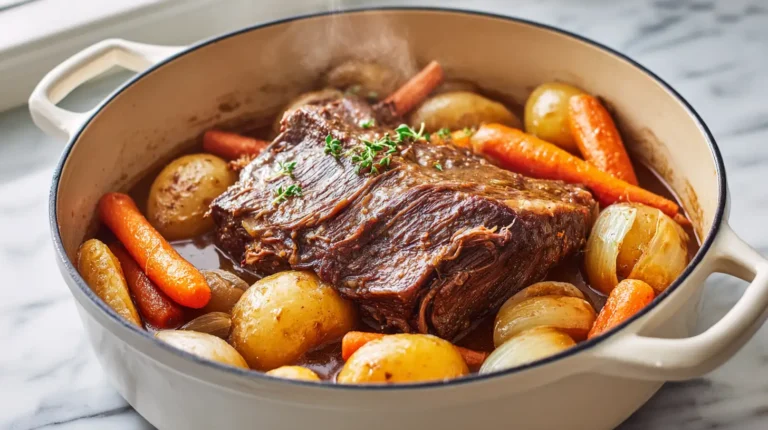
After searing, transfer the roast to a roasting pan (or leave it in the Dutch oven if you used one). Add your vegetables—I usually do carrots, potatoes, and onions—and pour in a couple cups of beef broth. Cover everything tightly with foil or a lid and roast for 3-4 hours, depending on the size of your roast.
You’ll know it’s done when the meat practically falls apart when you poke it with a fork. Let it rest for at least 15 minutes before slicing. This lets the juices redistribute so they don’t all run out when you cut into it.
Slow Cooker Method (For Busy Days)
If you know you’re going to have a crazy day, the slow cooker is your friend. Sear the roast the night before if you can (or skip it if you really must, though the flavor won’t be quite as deep). In the morning, throw everything in the slow cooker—roast, vegetables, herbs, broth—and set it on low for 8-10 hours.
Come home to a house that smells incredible and dinner that’s already done. It’s basically magic. The slow cooker is especially forgiving, so even if you leave it an extra hour because traffic was terrible, the roast will still be fine. Maybe even better.
For more slow-cooked beef inspiration, check out this Hawaiian beef stew recipe that uses similar low-and-slow techniques.
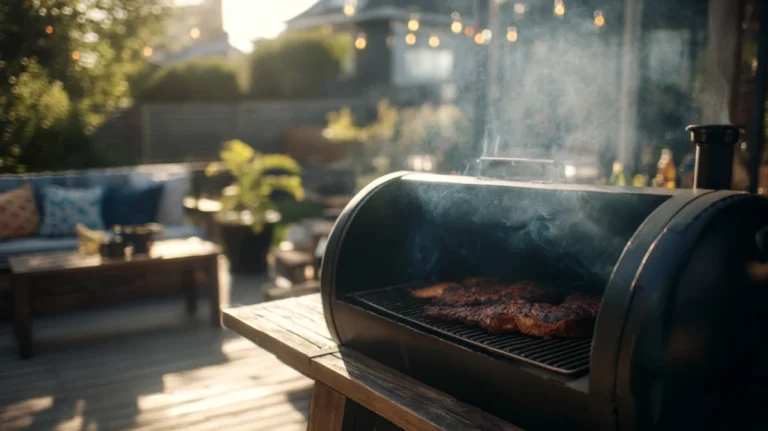
Grilling (When You Want Smoke)
Grilling an arm roast isn’t something I do often, but when we do it in summer, it’s fantastic. You need indirect heat for this—set up your grill so one side is hot and the other side has no flames underneath.
Sear the roast over high heat for about 5 minutes per side to get those gorgeous grill marks. Then move it to the cooler side, close the lid, and let it cook low and slow for 2-3 hours. Add wood chips if you want extra smoky flavor (hickory or mesquite are great with beef).
Keep an eye on the temperature—you want it around 300°F inside the grill. Too hot, and the outside will burn before the inside is tender. Too cool, and it’ll take forever.
Getting It Perfectly Done Every Time
The difference between an okay arm roast and an incredible arm roast often comes down to doneness. Cook it too little and it’s tough. Too much and it’s dry. But get it just right? That’s when you get fork-tender, juicy, melt-in-your-mouth perfection.
Arm Roast Recipe Temperature and Doneness Guide
I resisted buying a meat thermometer for years because I thought I could just tell by touch or whatever. Then I finally bought one and realized how much I’d been guessing wrong. Now I use it every time.
For arm roast, you’re aiming for around 190-200°F internal temperature. I know that sounds way higher than what you’d cook, say, a steak at, but remember—this is a tough cut with lots of connective tissue. It needs to get hot enough for that collagen to break down completely. That happens around 190°F, which is why low and slow cooking works so well.
Stick the thermometer into the thickest part of the roast, avoiding any bones if there are any. When it reads 190-195°F and the meat feels tender when you poke it, you’re good.
Resting Is Crucial (Don’t Skip)
I get it—the roast is done, everyone’s hungry, and you just want to slice and serve. But if you cut into it right away, all those beautiful juices will run out onto your cutting board instead of staying in the meat. Give it at least 15-20 minutes under a loose tent of foil.
The meat will actually continue cooking a bit during this time (carryover cooking), which is why you can pull it from the oven when it’s a few degrees below your target temp. And when you finally do slice it, it’ll be way juicier than if you’d dug in immediately.
Troubleshooting Common Problems
Even with the best intentions, things don’t always go perfectly. Here are the issues I’ve run into and how to fix them.
When the Meat Comes Out Tough
If your roast is tough, it almost always means one thing: it didn’t cook long enough. I know that sounds counterintuitive (shouldn’t less cooking keep it tender?), but with tough cuts like arm roast, you need time for the connective tissue to break down.
If you cut into it and realize it’s tough, you can actually put it back in the oven or slow cooker with some extra liquid and keep cooking. It’ll eventually get there. It’s not ruined—it’s just not done yet.
Dry, Overcooked Roast
Overcooking is trickier to fix, but not impossible. If your roast is dry, it’s usually because the temperature was too high or there wasn’t enough liquid in the cooking vessel. Next time, make sure you’re cooking at 325°F or lower, and add plenty of broth.
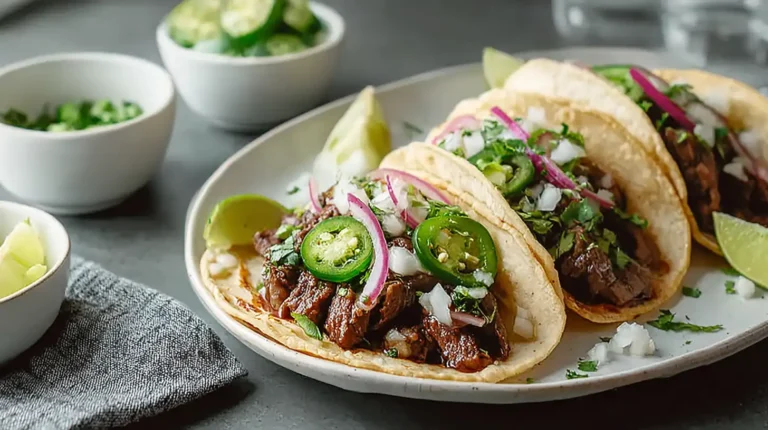
If it’s already overcooked, slice it thin and serve it with lots of the cooking liquid or gravy. You can also shred it and mix it with barbecue sauce or broth to rehydrate it—makes great sandwiches or tacos that way.
Uneven Cooking
Sometimes one end of the roast is perfect and the other end is overdone or underdone. This usually happens if your oven has hot spots or if the roast is an irregular shape.
Solutions? Rotate the roasting pan halfway through cooking. If one end of the roast is significantly thinner, you can fold it under and tie it with kitchen twine so the whole thing cooks more evenly. And use an oven thermometer to make sure your oven is actually the temperature it says it is (mine runs about 15 degrees hot, which I only discovered with a thermometer).
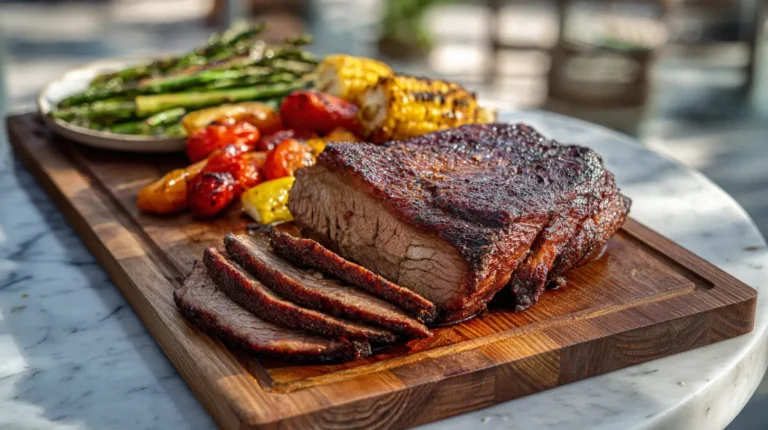
What to Serve With Arm Roast
Arm roast is a hearty main dish, so you want sides that complement without competing. Here’s what we usually make.
Roasted Vegetables
The easiest move is to roast vegetables right alongside the meat. Carrots, potatoes, and onions are classic for a reason—they soak up all those beefy juices and get caramelized and sweet. I usually chop them into big chunks so they don’t turn to mush during the long cooking time.
Sometimes I’ll throw in parsnips or sweet potatoes for variety. Brussels sprouts are great too if you add them in the last hour so they don’t overcook.
Mashed Potatoes (Always a Winner)
Creamy mashed potatoes are perfect for soaking up gravy. I make mine pretty simple—boiled potatoes mashed with butter, milk, salt, and pepper. Sometimes I’ll add roasted garlic if I’m feeling fancy, but honestly, classic mashed potatoes are hard to beat.
Pro tip: save the cooking liquid from the roast and use it as gravy over the potatoes. It’s packed with flavor and way better than anything from a jar.
Bread (For Soaking Up Juices)
Don’t underestimate the power of good bread. Crusty rolls or a fresh baguette are perfect for mopping up any juices left on your plate. Nicolas is basically obsessed with doing this—sometimes I think he looks forward to the bread more than the actual roast.
If you want to get really fancy, make Yorkshire pudding. It’s a British thing that’s basically a popover, and it’s incredible with roast beef.
Storing and Using Leftovers
Leftovers are where arm roast really shines. The meat actually tastes better the next day once all the flavors have had time to meld.

How to Store It Right
Let the roast cool down completely before storing (leave it out for an hour or so, but not more than two for food safety reasons). Slice it up—it’ll reheat better in slices than as one big hunk—and store in airtight containers in the fridge for up to 4 days.
If you want to freeze it, wrap individual portions tightly in plastic wrap, then put them in freezer bags. Squeeze out as much air as possible. It’ll keep for about 3 months in the freezer. Thaw in the fridge overnight before reheating.
Reheating Without Drying It Out
The key to reheating any beef is moisture. Don’t just stick it in the microwave by itself—it’ll turn into shoe leather. Add a splash of beef broth or the cooking liquid, cover it, and heat gently.
My favorite method is the oven: arrange the slices in a baking dish, add a bit of liquid, cover tightly with foil, and heat at 300°F for about 20 minutes. The meat comes out tender and juicy, almost like it just came out of the oven the first time.
Leftover Ideas
Leftover arm roast makes the best sandwiches. Pile it on a roll with some horseradish or Dijon mustard, maybe a little cheese, and you’ve got lunch. We also use it in beef and vegetable soup, tacos (shred it and season with cumin and chili powder), or even fried rice.
One of our favorite quick dinners is to chop up the leftover roast and toss it with pasta and whatever vegetables we have. Add some of the cooking liquid or a little butter and Parmesan, and it’s a whole new meal. You could also try it in these steak pasta recipes for more ideas.
Nutritional Breakdown (If You Care About That)
Arm roast is actually pretty nutritious, which is a nice bonus on top of tasting great. It’s high in protein (about 23 grams per 4-ounce serving), which keeps you full. It’s also a good source of iron, which is important for energy and preventing anemia—especially for kids and women.
You’re also getting B vitamins, particularly B12, which is only found in animal products and is crucial for brain function and energy metabolism. And there’s zinc, which supports your immune system.
Yes, there’s fat—about 18 grams per serving—but a lot of that renders out during cooking, or you can trim it before eating. The key is portion control and balancing it with vegetables.
Questions People Always Ask Me
Every time I serve this to friends or mention it online, I get the same questions. So let’s knock them out.
Can I cook an arm roast from the freezer?
Technically yes, but it’s not ideal. It’ll take way longer to cook (maybe 50% longer), and you can’t sear it properly when it’s frozen, so you lose some flavor. If you forget to thaw it, you can do it; just add extra time and liquid. But if you can, thaw it in the fridge overnight.
Do I have to sear it first?
You don’t have to, but you really should. Searing creates a flavorful crust and adds depth to the whole dish. I’ve skipped it when I’m in a major rush, and the roast still turns out okay, but it’s noticeably less flavorful. It’s worth the extra 10 minutes.
What’s the difference between arm roast and chuck roast?
They’re both from the shoulder area, so they’re pretty similar. Arm roast tends to be a bit leaner and can be slightly more tender, but they cook the same way and can usually be substituted for each other in recipes. If the store only has chuck roast, go ahead and use it with this recipe—it’ll work fine.
Can I use a pressure cooker or Instant Pot?
Absolutely. Sear the roast using the sauté function, then add your liquid and vegetables, seal the lid, and cook on high pressure for about 60-70 minutes for a 3-4 pound roast. Let it naturally release pressure for at least 15 minutes before opening. It’ll be fall-apart tender in a fraction of the time. Check out more Instant Pot recipes if that’s your preferred method.
Final Thoughts
Listen, I know arm roast isn’t the fanciest cut of beef. It doesn’t have the prestige of a tenderloin or the Instagram appeal of a tomahawk steak. But what it does have is flavor, versatility, and the ability to feed your family without emptying your wallet. And when you cook it right—low and slow, with patience and a little care—it’s absolutely delicious.
The first time you make this, follow the recipe pretty closely. Once you get a feel for it, you can start experimenting. So grab a chuck roast next time you’re at the store. Give it a shot. That’s when cooking gets fun—when you stop following rules and start making it your own.
So grab an arm roast next time you’re at the store. Give it a shot. And if it doesn’t turn out perfect the first time? That’s okay. Mine sure didn’t. But you’ll figure it out, and when you do, you’ll have a go-to recipe that your family asks for again and again.